WebSocket简单介绍

WebSocket 是什么

阮一峰老师有过一篇博文清晰易懂地介绍了 WebSocket

下面主要通过一个例子介绍 WebSocket 在 Spring中是如何使用的.

前端代码

1
2
3
4
5
6
7
8
9
10
11
12
13
14
15
16
17
18
19
20
21
22
23
24
25
26
27
28
29
30
31
32
33
34
35
36
37
38
39
40
41
42
43
44
45
46
47
48
49
50
51
<!DOCTYPE html>
<html lang="en">
<head>
<meta charset="UTF-8">
<title>Document</title>
</head>
<body>

<!-- 播放音乐 -->
<audio id="notice" loop="loop">
<source src="music.m4a" type="audio/mp4">
</audio>

<script>
var websocket = null;
if('WebSocket' in window) {
websocket = new WebSocket('ws://localhost:8080/webSocket');
} else {
alert('该浏览器不支持WebSocket!');
}

websocket.onopen = function (event) {
console.log('建立连接');
websocket.send("Hello, WebSocket! 来自客户端");
}

websocket.onclose = function (event) {
console.log('连接关闭');
}

websocket.onmessage = function (event) {
console.log('收到消息: ' + event.data);
// 播放音乐, 提醒消息
document.getElementById("notice").play();

setTimeout(function() {
document.getElementById("notice").pause();
}, 2000);
}


websocket.onerror = function () {
alert('websocket通信发生错误!');
}

websocket.onbeforeunload = function () {
websocket.close();
}
</script>
</body>
</html>

后端主要代码(SpringBoot)

其中主要依赖如下

1
2
3
4
5
6
7
8
9
10
11
12
13
14
15
16
17
18
19
20
21
<dependencies>
<dependency>
<groupId>org.springframework.boot</groupId>
<artifactId>spring-boot-starter-web</artifactId>
</dependency>
<dependency>
<groupId>org.springframework.boot</groupId>
<artifactId>spring-boot-starter-websocket</artifactId>
</dependency>

<dependency>
<groupId>org.projectlombok</groupId>
<artifactId>lombok</artifactId>
</dependency>

<dependency>
<groupId>org.springframework.boot</groupId>
<artifactId>spring-boot-starter-test</artifactId>
<scope>test</scope>
</dependency>
</dependencies>

WebSocketConfig.java
1
2
3
4
5
6
7
8
9
10
11
12
13
14
package com.example.websocket_demo.config;

import org.springframework.context.annotation.Bean;
import org.springframework.stereotype.Component;
import org.springframework.web.socket.server.standard.ServerEndpointExporter;

@Component
public class WebSocketConfig {

@Bean
public ServerEndpointExporter serverEndpointConfig() {
return new ServerEndpointExporter();
}
}
WebSocket.java
1
2
3
4
5
6
7
8
9
10
11
12
13
14
15
16
17
18
19
20
21
22
23
24
25
26
27
28
29
30
31
32
33
34
35
36
37
38
39
40
41
42
43
44
45
46
47
48
49
package com.example.websocket_demo.service;

import lombok.extern.slf4j.Slf4j;
import org.springframework.stereotype.Component;
import javax.websocket.OnClose;
import javax.websocket.OnMessage;
import javax.websocket.OnOpen;
import javax.websocket.Session;
import javax.websocket.server.ServerEndpoint;
import java.util.concurrent.CopyOnWriteArraySet;

@Component
@ServerEndpoint("/webSocket")
@Slf4j
public class WebSocket {

private Session session;

private static CopyOnWriteArraySet<WebSocket> webSocketSet = new CopyOnWriteArraySet<>();

@OnOpen
public void onOpen(Session session) {
this.session = session;
webSocketSet.add(this);
log.info("[webSocket消息] 有新的连接, 总数: {}", webSocketSet.size());
}

@OnClose
public void onClose() {
webSocketSet.remove(this);
log.info("[webSocket消息] 连接断开, 总数: {}", webSocketSet.size());
}

@OnMessage
public void onMessage(String message) {
log.info("[webSocket消息] 收到客户端发来的消息: {}", message);
}

public void sendMessage(String message) {
for (WebSocket webSocket: webSocketSet) {
log.info("[webSocket消息] 广播消息, message={}", message);
try {
webSocket.session.getBasicRemote().sendText(message);
} catch (Exception e) {
e.printStackTrace();
}
}
}
}
MainController.java
1
2
3
4
5
6
7
8
9
10
11
12
13
14
15
16
17
18
19
package com.example.websocket_demo.controller;

import com.example.websocket_demo.service.WebSocket;
import org.springframework.beans.factory.annotation.Autowired;
import org.springframework.web.bind.annotation.GetMapping;
import org.springframework.web.bind.annotation.RestController;

@RestController
public class MainController {

@Autowired
private WebSocket webSocket;

@GetMapping("/testWebSocket")
public String testWebSocket() {
webSocket.sendMessage("有新的订单!");
return "ok";
}
}

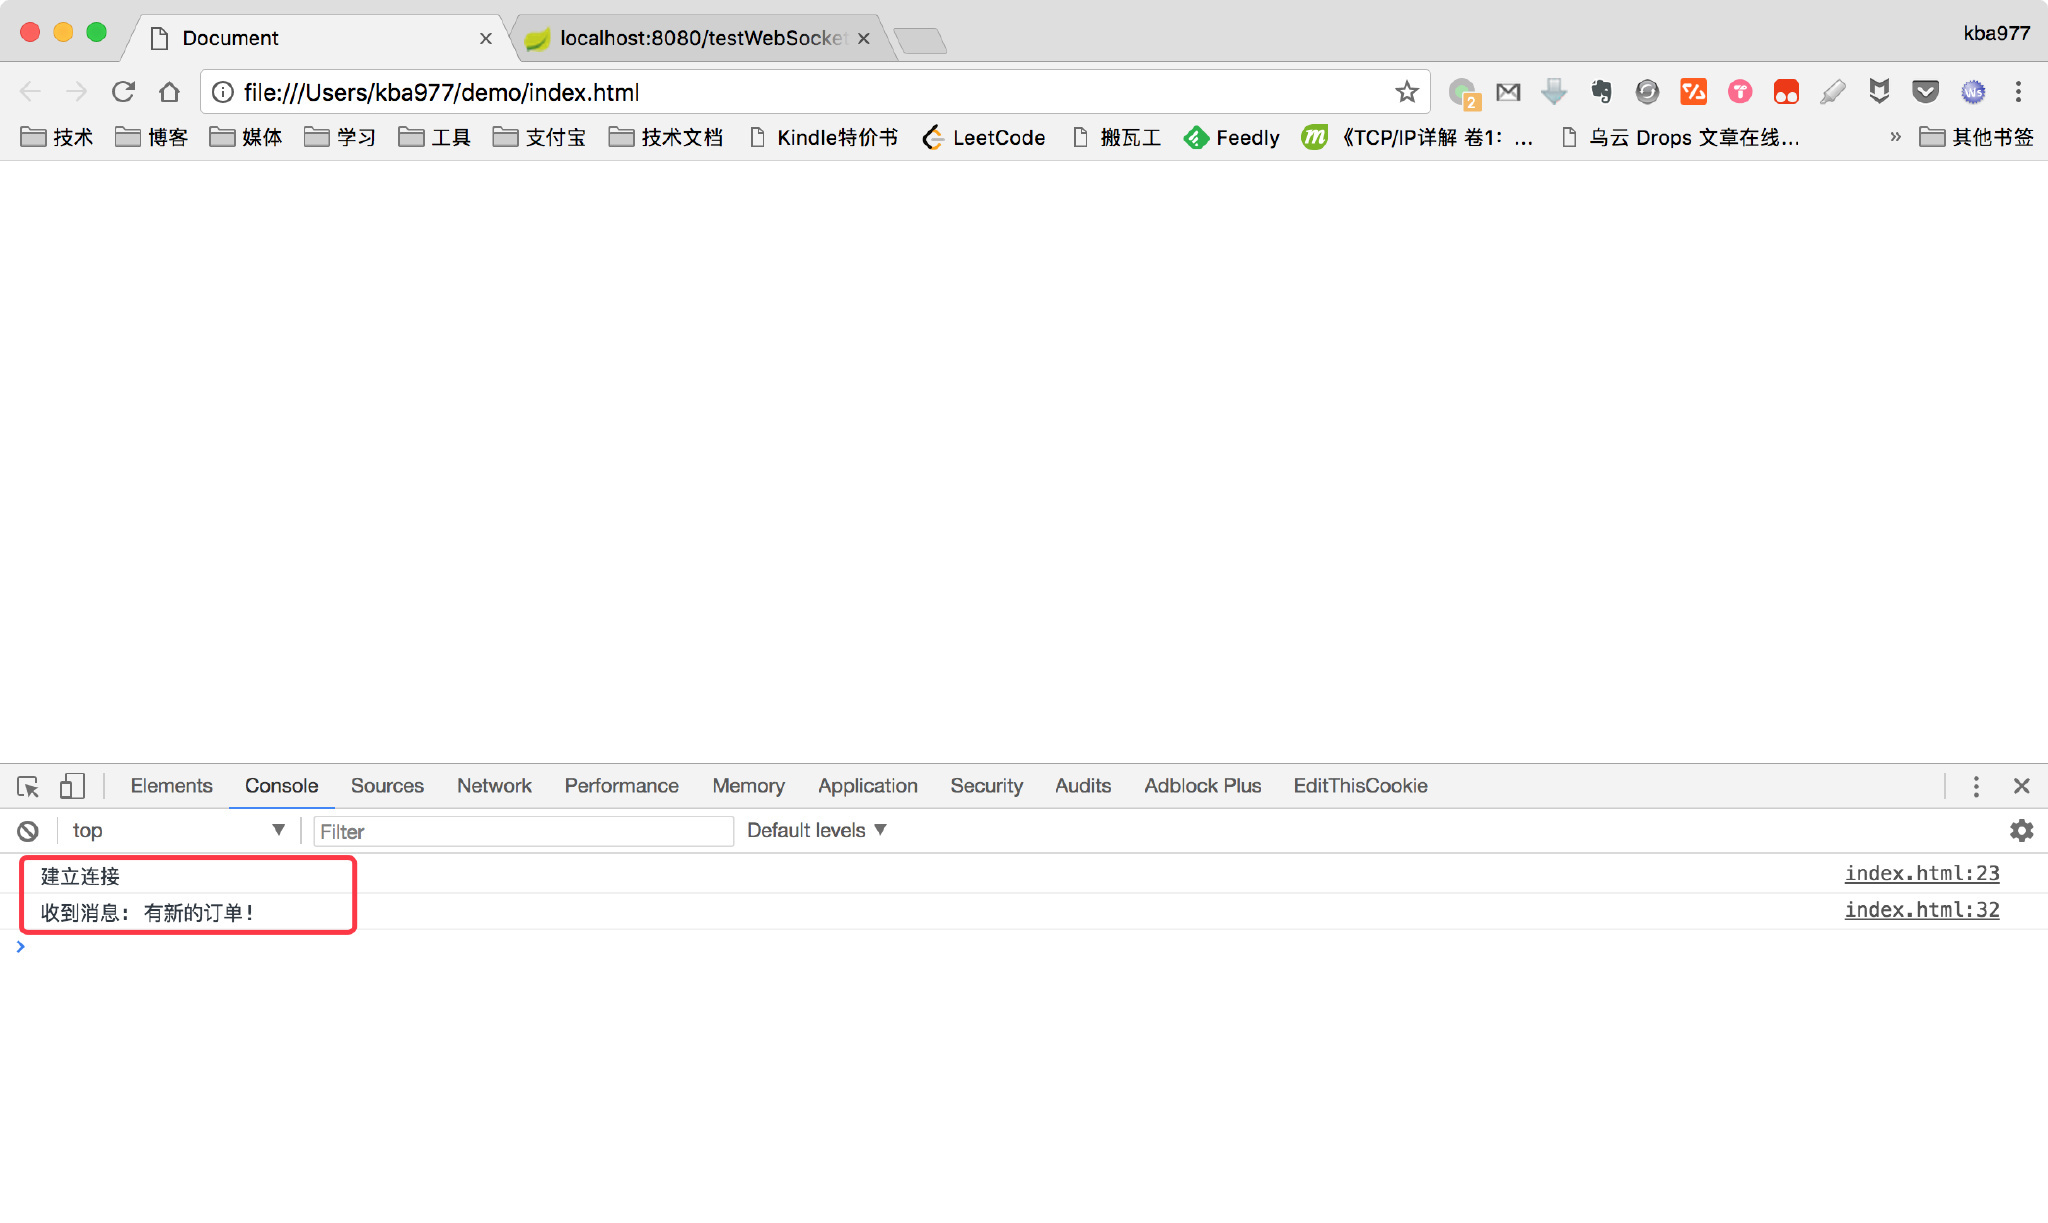
效果展示

如下图所示, 在我们访问 /testWebSocket 后, 会有一条消息从服务端发送到我们的前端页面